
Push notifications are essential for modern mobile apps. While Android implementation is straightforward, iOS requires extra steps due to Apple’s stricter security and privacy policies. This guide provides a step-by-step walkthrough for enabling iOS push notifications in your Flutter app using Firebase Cloud Messaging (FCM).
Important: iOS Push notifications do not work on the Simulator. Always use a real device for testing.
Prerequisites
Before starting, ensure you have:
- A Flutter project with iOS support (
flutter create my_app) - Xcode installed on your Mac
- An Apple Developer account
- A Firebase project
You should also be familiar with basic Flutter and Firebase setup.
Step 1: Configure Your App in Xcode
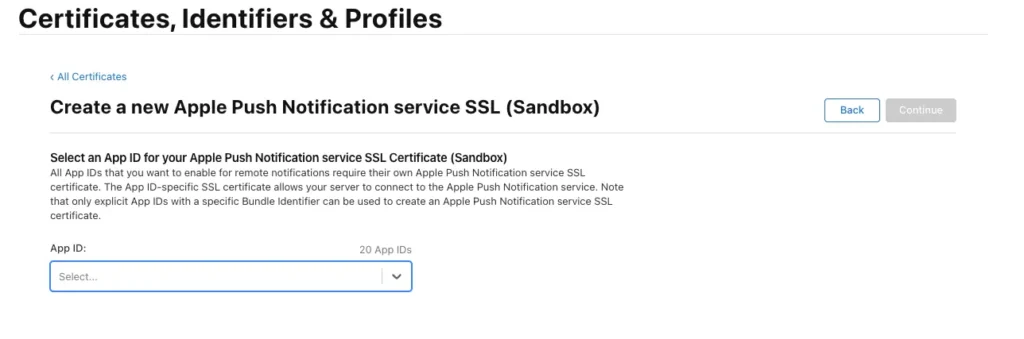
1.1 Create an App ID
- Open the Apple Developer Portal and navigate to Identifiers → App IDs → Add (+).
- Select App as the type and click Continue.
- Enter a description (e.g., My Flutter App) and bundle identifier (e.g., com.mohsin.myapp).
- Check Push Notifications under Capabilities.
- Click Continue and Register.

Your App ID now supports push notifications.
1.2 Configure Xcode
- Open your Flutter project’s iOS module in Xcode:
open ios/Runner.xcworkspace - Go to Signing & Capabilities → Team and select your Apple Developer team.
- Set the Bundle Identifier to match the one you registered in step 1.
- Click the + Capability button and add:
- Push Notifications
- Background Modes → enable Background fetch and Remote notifications

Sometimes Xcode takes a few minutes to recognize a new bundle ID. Be patient.
Step 2: Generate an APNs Authentication Key
Apple now prefers APNs keys (.p8) over certificates (.p12). Keys are simpler to use and don’t require renewal.
2.1 Generate Key
– Navigate to Apple Developer Keys.
– Click + to create a new key.
– Select Apple Push Notification service (APNs) and continue.
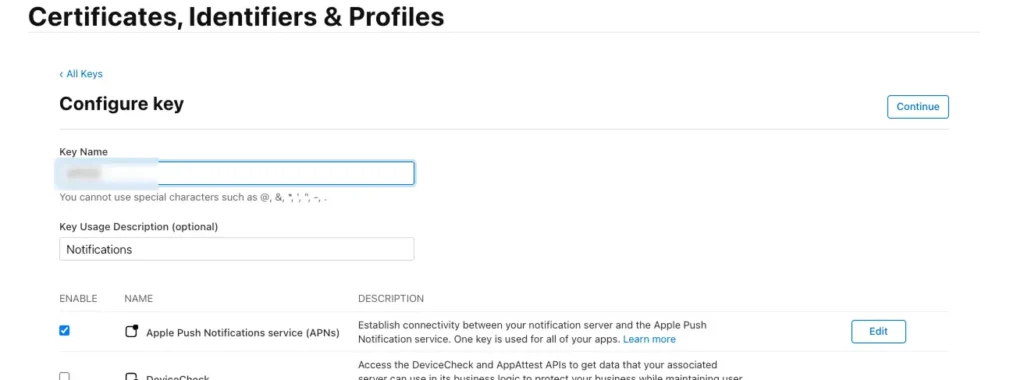
– Save the Key ID and download the .p8 file.
Store this key safely—you can only download it once.
Step 3: Connect Your APNs Key to Firebase
- Open the Firebase Console and select your project.
- Add an iOS app if you haven’t already.
- Go to Project Settings → Cloud Messaging.
- Upload your APNs key (.p8) and enter:
- Key ID (from Apple Developer)
- Apple Team ID
- Click Save.
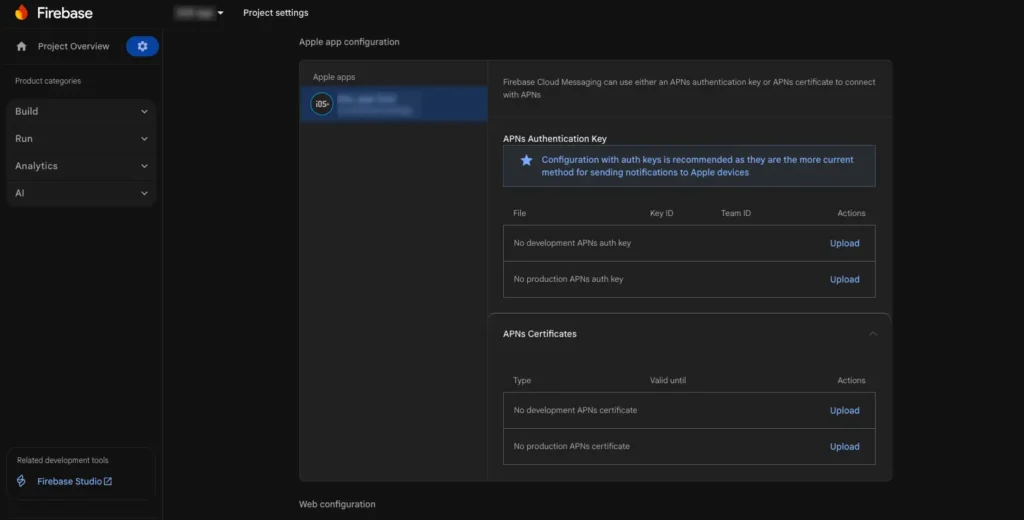
Firebase is now connected to your app for iOS push notifications.
Step 4: Flutter Integration and Requesting Permissions
4.1 Install firebase_messaging
Add firebase_messaging to your pubspec.yaml:
dependencies:
flutter:
sdk:flutter
firebase_core:^2.22.0
firebase_messaging:^14.4.0
Run:
flutter pub get
4.2 Initialize Firebase
Initialize Firebase before using messaging:
import 'package:firebase_core/firebase_core.dart';
import 'package:flutter/material.dart';

void main() async {
  WidgetsFlutterBinding.ensureInitialized();
  await Firebase.initializeApp();
  runApp(MyApp());
}
4.3 Request iOS Permissions
import 'dart:io';
import 'package:firebase_messaging/firebase_messaging.dart';

final FirebaseMessaging _firebaseMessaging = FirebaseMessaging.instance;

if (Platform.isIOS) {
  NotificationSettings settings = await _firebaseMessaging.requestPermission(
    alert: true,
    badge: true,
    sound: true,
  );

  print('User granted permission: ${settings.authorizationStatus}');
}
This code ensures users can receive push notifications. iOS requires explicit user permission.
Step 5: Handling Incoming Notifications
Firebase provides callbacks to handle messages:
FirebaseMessaging.onMessage.listen((RemoteMessage message) {
  print('Received a message while in the foreground!');
  print('Message data: ${message.data}');

  if (message.notification != null) {
    print('Message also contained a notification: ${message.notification}');
  }
});

FirebaseMessaging.onMessageOpenedApp.listen((RemoteMessage message) {
  print('Notification caused app to open!');
});
You can customize this to show local notifications or navigate to specific screens.
Step 6: Troubleshooting Common Issues
| Error | Cause | Solution |
|---|---|---|
[Firebase/Core][I-COR000005] No app has been configured yet | Firebase not initialized | CallFirebase.initializeApp()before any messaging code |
| Push notifications not received | APNs key not uploaded or bundle mismatch | Verify key, Team ID, and bundle ID in Firebase and Apple Developer Portal |
| Notifications only work in background | Foreground not handled | UseFirebaseMessaging.onMessageto handle foreground messages |
Tips and Best Practices
- Always test on a real iOS device.
- Keep your APNs key secure—do not commit it to Git.
- Use a single team account to manage app notifications and avoid issues with multiple team members.
- Enable background modes carefully to avoid battery drain.
Flutter iOS push notifications play a critical role in building modern, user-engaging mobile applications. When implemented correctly using Firebase Cloud Messaging (FCM) and Apple Push Notification service (APNs), Flutter apps can reliably deliver real-time alerts, updates, and background notifications on iOS devices.
This Flutter iOS push notification setup ensures proper APNs integration, secure key handling, and seamless Firebase communication. By following Firebase Cloud Messaging best practices, developers can avoid common iOS notification issues such as permission errors, foreground message handling problems, or APNs authentication failures.
Whether you are building a production app or testing locally, mastering FCM push notifications in Flutter for iOS will significantly improve user retention and app reliability. Always keep Firebase, Flutter, and Xcode configurations aligned to ensure your Flutter push notifications on iOS work smoothly across all app states.
Conclusion
Setting up iOS push notifications in Flutter may seem challenging, but following these steps ensures smooth integration with Firebase Cloud Messaging. With push notifications properly configured, your app can engage users effectively and deliver timely updates.
Remember: Use APNs keys instead of certificates for a simpler, long-term solution.