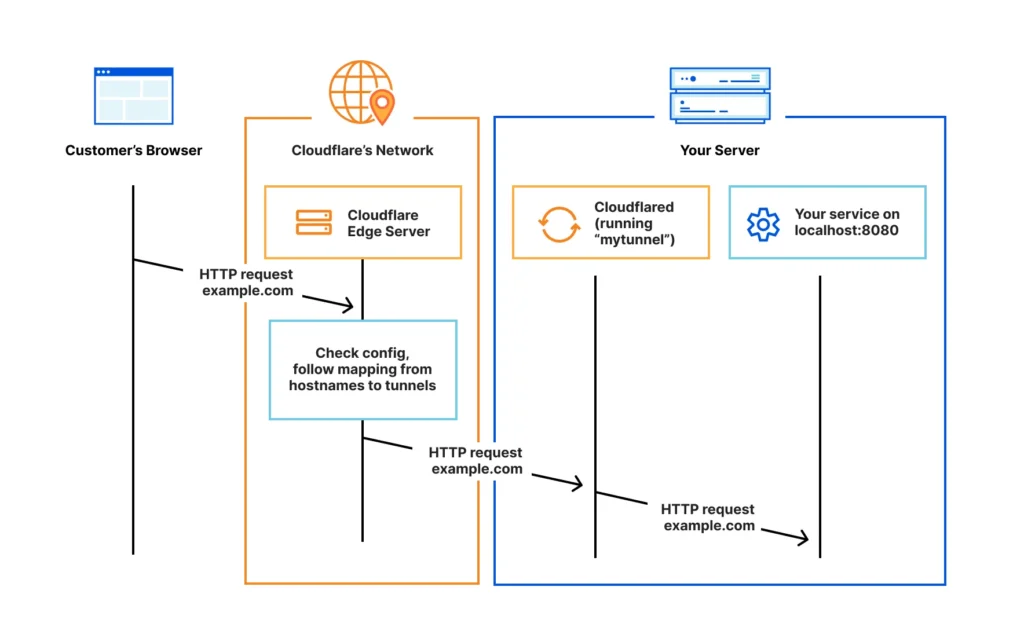
Running local n8n with custom domain is ideal for development, but real-world automations often require webhooks and client access. Instead of temporary tunnels like ngrok, you can use Cloudflare Tunnel to expose your local n8n on a professional HTTPS subdomain, e.g., n8n.yourdomain.com.
This full guide covers macOS, Windows, and Linux, including setup, configuration, and optional security measures.
Why Use Cloudflare Tunnel?
- Free HTTPS subdomain with a professional URL
- Stable and reliable for webhooks and integrations
- No firewall or port configuration required
- Subdomain automatically created and managed
- Works across macOS, Windows, and Linux
Prerequisites
- A domain (e.g.,
yourdomain.com) added to Cloudflare - n8n running locally (
http://localhost:5678) - macOS, Windows, or Linux machine
Note: You do not need to manually create a subdomain; Cloudflare Tunnel will handle it.
Step 1: Install Cloudflare Tunnel (cloudflared)
macOS
brew install cloudflare/cloudflare/cloudflared
Windows
Download the Windows version from Cloudflare official site, then add cloudflared.exe to your PATH.
Linux
# Debian/Ubuntu
wget https://github.com/cloudflare/cloudflared/releases/latest/download/cloudflared-linux-amd64.deb
sudo dpkg -i cloudflared-linux-amd64.deb

# RedHat/CentOS
wget https://github.com/cloudflare/cloudflared/releases/latest/download/cloudflared-linux-amd64.rpm
sudo rpm -i cloudflared-linux-amd64.rpm
Verify installation:
cloudflared --version
Step 2: Authenticate with Cloudflare
cloudflared tunnel login
A browser window will open. Log in to Cloudflare and authorize access for your domain.
Step 3: Create a Tunnel
cloudflared tunnel create n8n-tunnel
This generates:
- Tunnel ID (
<TUNNEL_ID>placeholder) - Credentials JSON file stored locally
Keep your real Tunnel ID and credentials file private.
Step 4: Create and Link the Subdomain
cloudflared tunnel route dns n8n-tunnel n8n.yourdomain.com
Cloudflare will automatically create a DNS record:
n8n → <TUNNEL_ID>.cfargotunnel.com (Proxied)
Step 5: Configure the Tunnel
Create the configuration file:
~/.cloudflared/config.yml  # macOS/Linux
C:\Users\<YOUR_USERNAME>\.cloudflared\config.yml  # Windows
Example configuration:
tunnel: <TUNNEL_ID>
credentials-file: /Users/<YOUR_USERNAME>/.cloudflared/<TUNNEL_ID>.json

ingress:
  - hostname: n8n.yourdomain.com
    service: http://localhost:5678
  - service: http_status:404
Adjust the credentials file path for your OS.
Step 6: Run the Tunnel
cloudflared tunnel run n8n-tunnel
Keep this terminal running. Your subdomain is now live and pointing to your local n8n.
Step 7: Configure n8n Environment Variables
Set environment variables so n8n generates correct public webhook URLs:
macOS/Linux (bash/zsh)
export N8N_HOST=n8n.yourdomain.com
export N8N_PROTOCOL=https
export WEBHOOK_URL=https://n8n.yourdomain.com
npx n8n
Windows (Command Prompt)
set N8N_HOST=n8n.yourdomain.com
set N8N_PROTOCOL=https
set WEBHOOK_URL=https://n8n.yourdomain.com
npx n8n
Step 8: Access n8n
Open your browser and visit:
https://n8n.yourdomain.com
Your local n8n is now accessible via a professional, secure subdomain.
Step 9: Optional Security Measures
Enable Basic Authentication
export N8N_BASIC_AUTH_ACTIVE=true
export N8N_BASIC_AUTH_USER=admin
export N8N_BASIC_AUTH_PASSWORD=strongpassword
On Windows, replace
exportwithset.
Advanced Security
Use Cloudflare Zero Trust (Access) to restrict access by IP, email, or SSO.
Conclusion
Using Cloudflare Tunnel is a professional, secure way to expose a local n8n instance to the internet. It works across macOS, Windows, and Linux, provides stable HTTPS URLs, and is perfect for real-world automations and client testing.
With this setup, you have:
- ✔ Local n8n accessible anywhere
- ✔ Free, secure HTTPS subdomain
- ✔ Stable webhook URLs
- ✔ No firewall or port configuration required
- ✔ Cross-platform compatibility
Happy automating